Quick and Easy Bar Sign Ideas – Made for around $8!


IMG_2951

Hello there! Little man P and I have just returned home from a nice long visit to family back home on the east coast. While I’m hesitant to call my trip a “vacation” because of all the running around we did pretty much the entire time, it was definitely a ton of fun and super productive – especially when it came to DIY-ing!

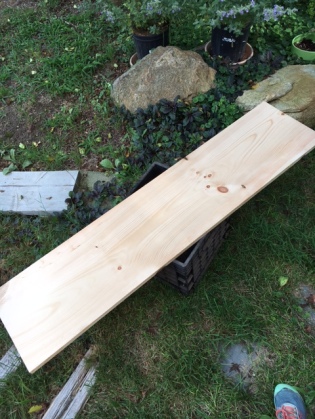
Since my Mom aka Nanny (Nanny is what P calls my Mom but for the purpose of this post it might as well be used in the vocational sense as well, haha) was more than willing to help out with my stinky frog I had a lot of time to devote to working on several projects, all of which I’m excited to share with you! I’ll start off by sharing these adorable bar signs that I whipped up using an $8.00 piece of wood. I actually ended up deviating from my original plan which was to attempt to create a DIY marquee bar sign but once I completed the painting part of the sign I chickened out on drilling the holes and inserting the lights because I thought it was super cute just the way it was (hopefully I can attempt the marquee sign soon though!) 🙂

phonto

As far as a tutorial goes I’ll share the fonts (usually I find fun fonts via dafont.com but these particular fonts are all available in current versions of Microsoft Word!) that I used for the signs but for an actual how-to hop over to my DIY Hand-Painted Sign post for a step-by-step tutorial on how to create a hand painted sign without a Silhouette or Cricut. These signs will also be available as a set in my Etsy shop if you’re looking to purchase something to spice up the look of your bar area or are in the market for a similar custom product (here is the link for this specific listing) 🙂


PRODUCTS/FONTS USED:

wood – 1 4’X1′ piece cut in half // paint – “Ultra White” and “Front Door Red” by Valspar // stain – “Jacobean” by Minwax // font for “bar” sign – “Bernard MT Condensed” // font for “eat, drink & be merry” sign – “Bernard MT Condensed”, “Script MT Bold”, “Algerian”


DIY Hanging Beach Sign – A Scrap Wood Project

phonto

So in catching you guys up on six months worth of projects and furniture updates I won’t even attempt to post in any sort of specific order, just whatever comes to mind that day or happens to be relevant to me at the moment, ha. One of my most recent projects was this little beach sign, that was prompted by an invitation to a “Pinterest Party” (everyone brings a Pinterest recipe and works on a craft from their Pinterest list or all work on one predicated craft, depending on what the group decides). Since we had just moved in and the house was in shambles (and lets be real – still is lol) I wasn’t about to go digging about for supplies but at the same time didn’t want to run out and re-buy a bunch of things that I already owned (albeit may never find based on the current state of what will eventually be turned to my craft room, haha). My solution? A scrap wood project!

One of the things we’ve learned in our many moves is that the movers will pack some strange things. Granted I appreciate them erring on the side of caution when packing items and not just assuming we wont need questionable items and tossing them to the side, there have been reports of movers packing used dog bones, toilet brushes (gah! so gross!) and even trash cans full of trash! Needless to say we usually wind up with one or two things that definitely didn’t need to make the trip and would have been just trashed at our place of origin, haha. This particular move they ended up packing up some scrap wood that was meant for the trash and I’m actually thankful they did! One ended up being a perfect two foot piece and even with our saw table still broken down I was able to find a small space in the corner of the garage to plug in our saw and cut it into three eight inch pieces on the floor – don’t attempt this at home, lol. As for the “seas the day” quote and beach style of this piece, it was inspired by our guest/kids bathroom which is a beach theme (you can read about our bathroom transformation here and although we’ve moved several times since, we’ve managed to keep the theme and same décor going from home to home). I’ll give a quick tutorial but make sure to check back on this post for links to other DIY beach projects you can find in this bathroom!

FullSizeRender

SUPPLIES:

  • 3 8″ pieces of scrap wood
  • paint – if you like my choices I used “Blue Lagoon” and “String of Pearls” both by Valspar (I purchased sample sizes of both) and both amazing coastal colors.
  • electric sander or sanding blocks
  • painter’s tape
  • x-acto knife
  • computer and printer
  • dark or clear furniture wax (hard or soft, whichever you prefer/have on hand)
  • 8 eye hooks – the size is up to you, I used very small ones since they’re not bearing any real weight.
  • twine
  • drill with very small drill bit – this is to drill tiny holes for the eye hooks on the bottoms and tops of the individual signs so it will be easy to twist them in. My hubby can usually twist these in without drilling so if you’re super jacked you might be able to skip this step [insert muscle emoji lol]
  • keyhole hanging system (to mount sign on the wall once complete)

INSTRUCTIONS

Step 1 – Begin by painting each of your three wood pieces in blue (or white if you plan on doing the reverse color scheme. Once dry, distress them by using either an electric sander, hand sander or sand paper.

Step 2 – For painting on your letters using the painter’s tape/x-acto knife method refer to this post. If you have access to a cricut or silhouette you can skip this step and just create your stencil using your machine.

Step 3 – Once you have the wording on your piece and it is fully dry lightly sand over the surface to further distress and remove any excess paint build up around the edges of the words. Dust off your piece and apply your wax as per the instructions on the particular wax you are using. I used a dark wax for this piece to add a warmth/distressed look – the soft wax I’ve been using lately is Chalk Mountain All Natural Wax available via Amazon. If you need some guidance or pointers on applying soft wax to your projects there are some great tutorials on YouTube!

Step 4 – Next, drill *very* small holes on the tops/bottoms of each piece where you plan to insert the eye hooks (I drilled them two inches in on each side), make sure your drill bit is smaller than the girth of your eye hooks because you want them to screw in tightly. Once you have drilled your holes simply twist in your eye hooks.

Step 5 – Almost done! Now use a small piece of twine to tie each of the signs together.  

Step 6 – Finally, secure your keyhole hangers to the back of the top-most piece. D-rings would work too I just prefer the keyhole hangers so that the sign will be flush with the wall.

That’s it! There you have it, a fun little beach sign that can be made with minimal materials. Don’t feel like making it yourself? It’s available in my Etsy shop so feel free to purchase one directly from me!

Fan of coastal chic décor? Here are some links to check out some of my other coastal chic projects:

Coastal Chic Side-Table Re-Do

DIY  Nautical Twine Picture Frame

13599978_10157148296985486_8751564839607738703_n

A snapshot of our current coastal living situation 🙂

Life lately – love, loss and lots in between …

Ah, yes, these “it’s-sure-been-a-while” posts have certainly become the norm for me this past year but I’ll try not to make a habit of it from this point forward. The happy cliffnotes version of the Schulze clan’s most recent happenings include a move across the country to sunny California and a new baby BOY on the way (due December 1st). Sadly this year has not been full of happy occurrences as shortly after my last post I lost one of my closest friends, Kim. Her passing was sudden and one of the hardest things I’ve experienced in my life. I felt that I couldn’t continue to post my usual blog content without first addressing and honoring a person who so greatly influenced (and will continue to influence) my life, yet couldn’t quite find the words. So, nearly six months later in wake of being asked to write a memorial article for our ten year high school reunion I felt that I should use this opportunity to begin to express in words how much Kim’s life meant to me and how deeply I’ve felt her loss ever since her passing.

Kim was one of the most wonderful people I’ve ever know, so much of my creativity has been sparked with her in mind and there isn’t a day that passes that she isn’t in my thoughts. While the assumption tends to be that time heals emotional wounds this won’t necessarily hold true in the case of a loss as time can simply bring to light the permanence of a passing as you begin to live life as you would, just with a special piece missing. These last few months have brought so many exciting changes to my life (pregnancy, a move to California etc.) and with each phone call that I can’t make to her, with each passing birthday of her children, her loss becomes all the more permanent to me. While it isn’t as if we spoke every day the fact that I know she is no longer a physical part of my life has me thinking about her constantly, longing to speak with her and full of sorrow for her family and the fact that she was a part of their every day lives and is now absent.  I feel that by addressing my feelings just a little bit to whomever might be reading this, it helps me to keep her alive in my heart (in a happy way) and might help to give those who didn’t know her a just a little hint of just how much her life impacted those around her and what a truly amazing woman, mother, daughter, sister and friend this world is now without.

In loving memory of Kim (12/4/87-2/21/16)


Skinny Berry Sangria

IMG_0606

This is a GREAT drink! So good in fact, that I had to wait for the after effects (and the memory of the after effects, lol) to wear off enough for me to stomach writing up the recipe for you guys, haha. The good news is as long as you don’t let these go down like water (as we did on our girl’s night) they shouldn’t give you any trouble but I will warn you it’s difficult because MAN are they delicious! This drink was my effort to create a fruity and fun “girl’s night” cocktail while keeping the calories at bay (the sugar content is still a factor but at least it’s from fruit and fruit juice, we do what we can right? haha). I love getting together with my girls for drinks but especially during the winter those extra calories hiding in your cocktails can definitely do some damage to the waistline. While it’s no secret that the best way to keep healthy and fit is to eliminate alcohol altogether, you’ll feel a little bit better about your decision to have a drink or two knowing that you were able to lighten them up even just a little bit! This is a great big-batch drink to make for a crowd and would be super fun for a bridal shower or summer event. That being said, cheers to warmer weather hopefully being on the horizon for us NOVA folks (but if not I can always warm up with this cocktail).

IMG_0596

Like my champagne glasses? They’re available here on Amazon in sets of four (“toast”, “sparkle”, “cheers” and “celebrate”) – so cute!

INGREDIENTS

IMG_0593

  • 1 bottle Sparkling Brut Rose (if you prefer a sweeter drink try a sparkling moscato or regular sparkling rose but I felt plenty of sweetness came from the fruit and cranberry juice)
  • 1/2-1 cup Berry Vodka (depending on how strong you want your sangria)
  • 1 cup berry or raspberry seltzer
  • 2 cups light or diet cran-raspberry juice
  • 1/2 cup each strawberries (sliced), raspberries and blueberries
  • frozen mixed berries for serving (optional)

INSTRUCTIONS

  1. Combine the fresh berries, vodka and cran-raspberry juice in a pitcher and allow to refrigerate for at least an hour.
  2. When ready to serve pour in seltzer and brut rose and stir. I served mine in champagne glasses with frozen mixed berries in lieu of ice cubes!

Simple Valentine’s Day Wreath

IMG_0039

Another holiday is right around the corner and depending on your personality (or relationship status, ha) you either love or hate this one – love everywhere, prepping for a fun night out (or in, in my case), flowers, the color PINK, tiny candy hearts … as you may have guessed I’m in the “love it” camp on this one … Valentine’s Day!!! I’m a sucker for really any holiday and no, we shouldn’t need a special day to shower the one we love with affection and goodies but isn’t it so fun nonetheless? Mine and J’s personal couple tradition since before we were even married has been to dress up and have a fancy dinner at home (this year’s meal includes a special shrimp appetizer that is a Schulze original and as long as it isn’t a total bust I plan on sharing it on the blog next week!). We prefer sharing a few cocktails in the relaxed environment of our own home, cooking a super fancy meal together  and really enjoying each other’s company as opposed to spending our Valentine’s Day in a crowded restaurant. It’s the simple things, right? Which brings me to this wreath – a super simple way to have an eye-catching door all month long!

182734_10150413236975486_818742_n

A few years (and a few pounds *sigh* lol) ago in our old place having our traditional “fancy” night in.

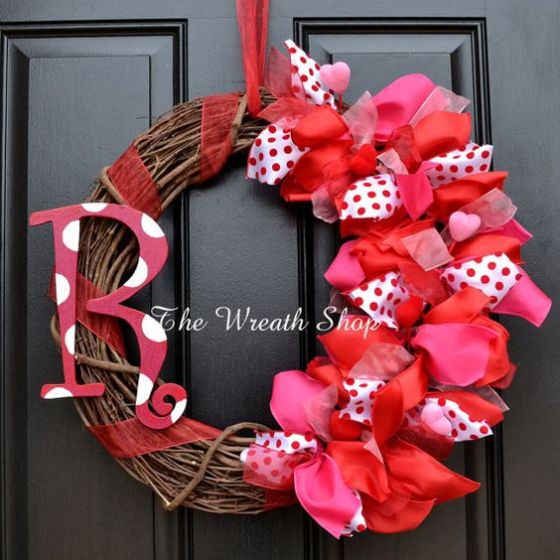
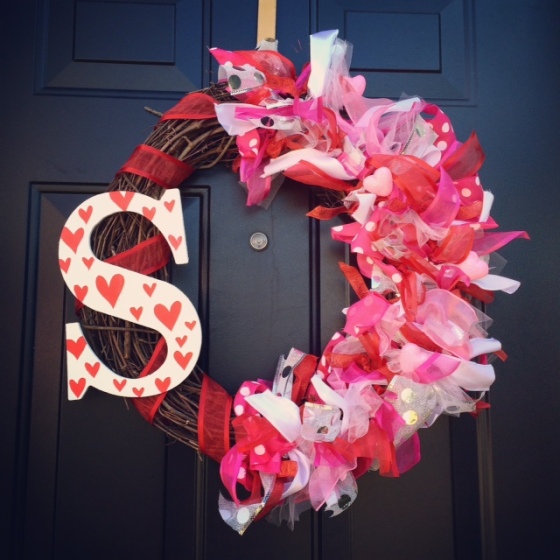
I was originally inspired by a wreath I came across on Pinterest (pictured below). Since the only necessary components seemed to be a grape vine wreath, a wooden letter and an assortment of ribbon, this seemed to be an easy fix for my Valentine’s Day door! I have been super into grapevine wreaths lately and have quite a few posts about them on the backburner (here is a fun springtime wreath using a grapevine frame) but for now I will say that I love them for a few reasons but mostly because they’re super cheap (you can get one for under $5.00, however, I  always use a coupon so it will come in around $2.50 or so) and they are super easy to work with; the tightly wound vines allow things to be stuck into them easily and pretty much any adhesive bonds well with them so it is easy to adhere embellishments as well. This wreath is very reminiscent of my St. Patty’s Day Rag Wreath which utilized mostly left over crafting supplies to create and I applied that same idea here as most of my ribbon I had on hand or was able to find half off at Hobby Lobby. This is a great beginner’s wreath as it doesn’t require any particular skill so if you can tie a knot you can do it, I promise, lol! Check out the tutorial below and if you’re feeling adventurous hop on over to my other Valentine’s Day posts (an Oversized Porch Sign and another Valentine’s Day Wreath) for some more crafting inspiration in this month of love xoxo.

12741884_10156521467810486_1622838805484619586_n

Happy Valentine’s Day from the Schulzes to you!!!


7d4e043a9926a96046b45fe84e816c05

My “pinspiration” – follow the link to find this particular wreath for sale here on Etsy – http://www.etsy.com/listing/175318886


IMG_0316

My version!

SUPPLIES

  • 12″ grapevine wreath – available at any craft store or where crafting supplies are sold.
  • assortment of wired ribbon of varying sizes – it isn’t 100% necessary to use wired ribbon but the ribbon will look more poofy and have a bit more structure and ability to stand up to the elements this way. The amount of ribbon is totally up to you, I think I used about six.
  • wooden letter – I chose to paint mine white and then add some hearts using this method. You can always just draw hearts or polka dots using an oil based Sharpie paint pen as well.
  • paint (for wooden letter, optional) –  latex, spray paint, acrylic really anything will do. I chose to spray paint mine because I already had some on hand and it’s probably the easiest method.

INSTRUCTIONS

  1. If you plan to paint your wooden letter, do this first. With any luck it will be dry by the time you finish the rest of the wreath.
  2. Begin by cutting your ribbon into about 3-4 inch strips. Some can be longer or shorter and in fact it’s more fun if they are not all the same size so that it creates a less uniform look.
  3. Next, begin tying your ribbons randomly onto different areas of the half of the wreath you’ve chosen to decorate. Simply loop the ribbon under one of the vines and then tie – that’s it! Repeat in this fashion until you’ve achieved a dense look with little to no wreath base showing through.
  4. To attach your wooden letter either tie it on using ribbon or if you have access to a staple gun (which is what I did) staple a pipe cleaner or other wire to the back of the letter and tie it onto the wreath in this manner.
  5. At this point feel free to add any additional embellishments (like my little glittery Styrofoam hearts) – the dollar store is a great resource for little things like this!

That’s it! If you’re like me and measure units of time in “naptimes” then this should only take you about 3/4 of a naptime lol. 

vdaywreath2

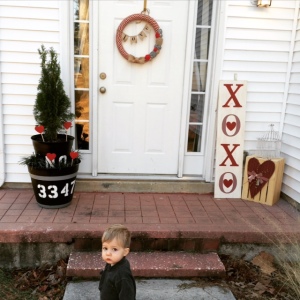
Last year’s Valentine’s Day porch!

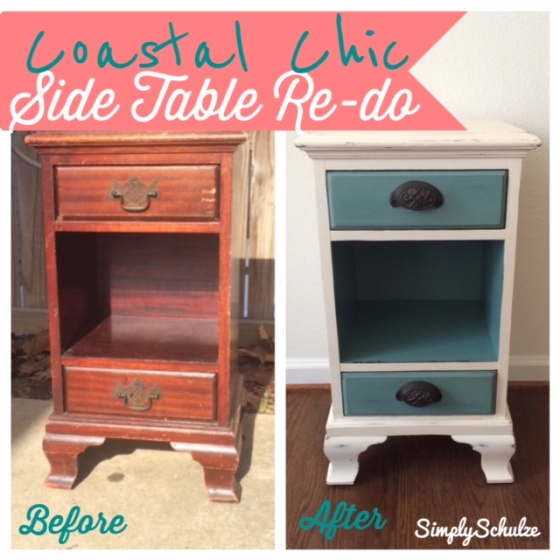
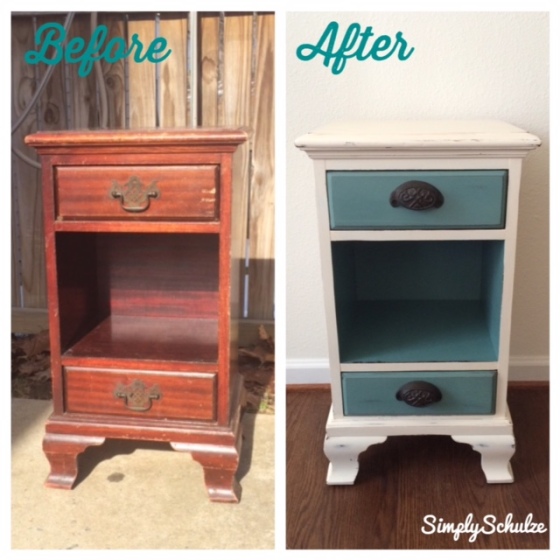
Coastal Chic Side Table Re-do – Blizzard Project #2

IMG_0556

Okay well I might be exaggerating about the “blizzard” part of this project a bit. The snow left just about as quickly as it came so “post-blizzard” project would probably be a more appropriate title :-p. However, since I had every intention of finishing this one up just as quickly as my first two-tone side table (an actual blizzard project that you can check out via the previous link), in the interest of not taking away from my sense of accomplishment I will still group it in with my other blizzard-inspired creations ;-).

Before pictures – this old girl definitely needed some help!

I had mentioned in my previous post that I’m constantly browsing the local online yard sale sites in hopes of coming across some perfectly-priced furniture treasures in need of a face lift. I’m so thankful for this method of seeking out pieces to re-do because while P is quite the well behaved little boy, thrift store hopping with a toddler in tow can present a wide array of challenges, haha. Additionally, cruising the online buy/sell/trade pieces has also helped me find some great furniture re-sale and consignment stores I might not have easily found otherwise and that is exactly how I came across this particular piece. Through her posts on our local area B/S/T page I was able to become connected with the home-based business Willow Tree Restorations (I have linked her Facebook business page just in case you are checking in from the NOVA area or simply want some inspiration, her work is fantastic!) where the owner, a woman after my own heart, finds and refinishes beautiful vintage pieces. While I love her refinished pieces oh-so much I especially love that most of the pieces she finds she will also offer up as-is so that DIY enthusiasts such as myself can try their handy work at making them their own.

How cute is sweet P helping to sand?! My little DIY-er in training. NOTE: I know a lot of people don’t bother sanding when using chalk paint but I always just give it a quick run over by hand with a sanding block or with the small electric sander on the larger surface areas of a piece.

As for the re-furb story behind this particular piece, I have been obsessing over the two-tone look lately (I’ve posted a few of my inspirational pieces below) and after my success with the last piece I knew I wanted to try it out with some color, especially because I knew that I didn’t have a place for this particular piece in my home and would probably be re-homing it, I could really get creative with a color scheme other than what I’ve been working with. While the beachy and “coastal-chic” color pallets have never had a place in my personal décor I’m loving blues, whites and aquas more and more as of late! The particular colors I mixed for this particular project (see this post for information on how I mix my own chalk paint) are “Patina Blue” by Valspar and “Antique White” by Valspar (a great white somewhere between true white and ivory that I use for a lot of projects). I mentioned in my previous post that I’ve been trying out some new products in an effort to go a natural route with my top coats and waxes as opposed to harsher products like Minwax so for this particular project I tried out Chalk Mountain Wax available on Amazon – I was very happy with how great the wax turned out and the pack of two waxes also come with a wax brush all for under $30.00 so definitely great value there. After lightly distressing the edges of the table I waxed the entire piece first with the clear wax followed by a single light coat of the dark, just to add some warmth. In the interest of giving the piece a complete facelift I picked up some new pulls from Hobby Lobby while they were 50% off (normally $4.99 each), I love how new pulls or knobs can really transform a piece and you definitely see that in the before and afters here, I suppose it was unnecessary but I can always reuse the original pulls on another piece in the future!

My little apprentice in action again! lol Thankfully I switched to that all natural wax. This little munch came right over and took the brush out of my hand and said “I’ll do it! I’ll do it!”.

IMG_0555

Wow – that was a long post for such a little side table, lol. I hope it inspires a little coastal-chic project of your own … or maybe even inspires a trip somewhere warm (can you tell I’m longing for summer over here? haha). Speaking of inspiration, two of the pictures below are linked to the online shops of friends of mine, so please check out and “like” their pages – they are super talented and even if you are not local to their areas to shop with them they are certainly a wealth of inspiration!

Here are a few pieces that inspired this project. Secretary desk: Shabby Chic Boutique Desk: The Handcrafted Life Dresser (found via Pinterest): Homeroad

Two-tone Side Table Re-do: Blizzard Project #1

phonto1.jpg

Personally being stuck in the house drives me crazy. Whether it’s running errands or just being outside with friends, little P and I are gone most of the day and I love it that way! Needless to say as winter storm Jonas approached and everyone began clearing out their local grocery stores and waiting on ridiculously long gas lines, I was headed to Lowes to pick up some DIY essentials (with only hours to spare, haha!) to ensure my sanity for the duration of our snow-bound adventure. Now rewind about a week – I’m always keeping my eye on local online yard sale sites on the lookout for fixer-upper treasures and hit the jackpot the last few weeks! For under $100 I was able to score FIVE amazing new pieces of furniture to re-do (and unbeknownst to me at the time, this storm was about to give me a great opportunity to get to work, haha). Hopefully even after the snow melts I can keep crankin’ out the rest of these pieces at my current pace but we’ll see ;-).

frog

Our last minute trip to Lowes. P was in all his crazy-haired, pajama-clad glory!

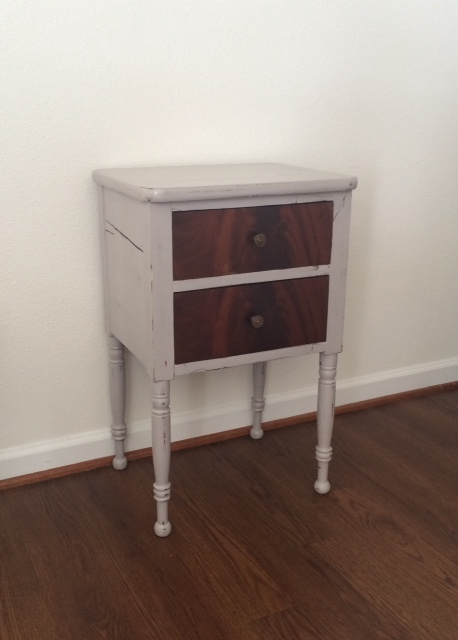
For now I’d like to share my first blizzard project – my two-tone side table. This piece was amazing and I couldn’t believe that the owner wanted to part with it (and for SO cheap), especially because it was so solid, it must weigh forty pounds if not more! Since I don’t have room for all of my creations I know that have to start selling things off here and there but I knew immediately that this is one that I would need to keep for myself. I loved the wood grain, which is why I chose to leave the drawers as is and loved the fact that the sides of the table actually had some noticeable splits in the wood which add to its character and vintage feel. I didn’t do anything special aside from try out a new wax which I plan to review in a separate post. I used my homemade chalk paint (see this post for the recipe and more information on mixing your own), distressed it a bit and then finished it using Dover’s Chalk Paint Wax – a new natural furniture wax I’m trying out in an attempt to get away from harsh chemical and VOC products like Minwax (although they have served me well to this point!). If you’re as in love with the color I used as I am, it’s “London Coach” by Valspar – doesn’t it just sound wintery and amazing!? I hope this project inspires a little snow day DIY on your end! xoxo

FullSizeRender

Finished product!


frogg

A little snippet of the fun that was had in all the snow!


Pottery Barn Hack – DIY Jumbo Advent Calendar

phonto

I don’t know about you but I’m currently in the final phases of what I like to call the holiday season “hangover” or the period immediately following the holidays when BAM – regular routine resumes. While you’re expected to just jump back into the swing of things it’s a little hard when you’re inevitably left with a house full of decorations in need of taking down (which you feel like you just put up), tons of cleaning that you’ve been putting off, a to-do list longer than Santa’s naughty list and if you’re anything like me, lets face it, probably an actual hangover haha. Needless to say the holidays are one heck of  a whirlwind but after a weekend of cleaning and de-Christmas-ing my home I can finally say that the Schulze household is almost back to normal.

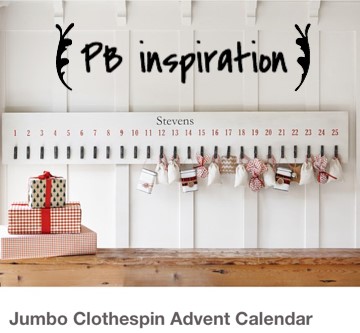
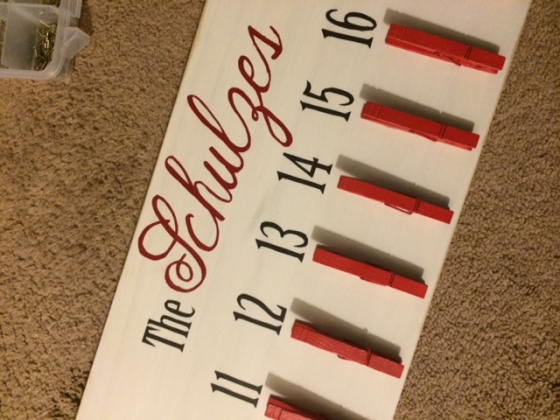
As I was sadly packing up the last of my holiday decor I realized that I was yet to share one of my favorite DIY holiday projects with you – my DIY advent calendar! I don’t know about you but my favorite projects tend to be the ones that save me the most coin, I mean we all love saving money but to me saving money and creating something great is the ultimate win-win. That is how I feel about this advent calendar, mostly because when that holiday edition of the PB catalogue comes to my door and I already know before opening it that I can’t justify buying a single thing in it, it is SO nice to once in a while use their over priced items as inspiration for something I can create for a fraction of the cost! The original cost of this advent calendar was $149.00 plus shipping – INSANE. That is almost two weeks worth of groceries for us lol. After all was said and done my total cost came in at around $25.00 and about an hour and a half of my time! Now bear in mind that your version need not be this big, I know it’s hard to find a place for a five foot seasonal wall hanging (haha) but I hope this project can inspire a little DIY advent calendar project of your own and get you looking forward to next holiday season as I always am! xoxo

phonto1

My inspiration for this project!


DIY Jumbo Advent Calendar

SUPPLIES

*Note: these are the supplies that I used to create this particular project, you can adapt your version as you see fit (smaller board, different font, colors, clothespin size etc.).

  • 1 large wooden board – Mine measured 5′ X 10″ (I think the total length was 6′ at time of purchase but I had it cut down). I used a pine board because I wanted it to be a little more durable and less likely to warp should I ever have to store it in the garage or in a basement depending on where we live at the time. It was a little more expensive (only by a few dollars, but still). If I wanted to save some extra coin I would have used the same wood that I chose for my Jumbo Outdoor Holiday Signs, which runs about $8-ish for a 4 foot piece.
  • 25 standard wooden clothespins – available pretty much anywhere, I believe even Dollar Tree carries them!
  • 25 small canvas bagshere is the link to where I purchased them via Amazon.
  • small letter/number stencils – available at any craft store but here is a link to a similar product on Amazon.
  • painters tape
  • x-acto knife
  • measuring tape
  • 2 large D-rings
  • industrial strength wood glue or multi-purpose glue – I use E-6000 for most of my projects that require a heavy duty adhesive and it always works well for me.
  • paint brushes
  • latex paint – I used black, red and white
  • red acrylic paint – for the canvas bags
  • red spray paint – for the clothespins

INSTRUCTIONS

I began by sanding down my wooden board just to smooth it out a bid and then painting it with one coat of white latex paint. I wanted some of he wood grain to show through since I was going for the “rustic” look of my PB inspirational piece.

While the board was drying I spray painted my clothespins on all sides and left them  to dry. I also used my stencils and red acrylic paint to paint the numbers 1-25 on each of my small canvas baggies.

untitled1

finished product!


Once my large board had dried I distressed it a little using my electric sander (a hand sander would work also) then used my painters tape and x-acto knife method to paint “The Schulzes” and the numbers 1-25 onto the board. You can find a quick tutorial for this method here! Before painting the letters on I placed the clothespins on the board (without gluing them) just to get an idea of how I wanted everything spaced out. If you like the fonts I used for this project the script is “Austie Bost – rest of our lives” (available for free download via dafont.com) and I believe the standard font is just a variation of Times New Roman.


After your paint has dried take a moment to screw the d-rings into the back of the board (this is easier to do prior to attaching the clothespins so that the board can still lay flat).

Finally, use the E-6000 glue to attach the clothespins below each of the numbers on the board. The glue dries clear and pretty fast so you should be ready to attach your little baggies in no time!

123

There you have it! One of my favorite holiday projects to date. I especially love that the bags are large enough to hold small toys and even little wooden trains so that we could fill them with surprises other than candy 🙂


New Year, old projects – catching up on the blog!

Wow it has certainly been a while. Surprise! I haven’t made good on my promise to update more regularly BUT one of my promises I’m making to myself (and to my followers) for the New Year is to post much more frequently and find more time write.

Although I’ve been short on time to write I certainly haven’t been short on time to craft and create! I’ve got a whole slew of great projects to share with you guys including some of my favorite furniture re-furbs to date! Also, if you’ve been looking for some wedding or event inspiration I had myself quite a time creating lots of unique pieces for a few fall weddings and events that I’m so excited to share with you.

As far as my little fam goes I’d like to say that the Schulze clan definitely rocked 2015. After our move to Quantico I spent the remainder of the summer and most of the fall traveling between Q and LI (with my little sidekick P in tow!) to fulfill my MOH duties, crafting all the while! It was definitely an exciting year filled with the love of friends and family and lots of fun, but with a little personal event kind of bumming me out at the close of the year I’m pretty excited to move forward and see what 2016 has to offer (all positive things I hope :)). Hope you all enjoyed 2015 as much as we did and I hope that you keep an eye out as I catch you up on all of this year’s projects!

Here are a few of our family highlights!

DIY Skeleton Wreath

skel5

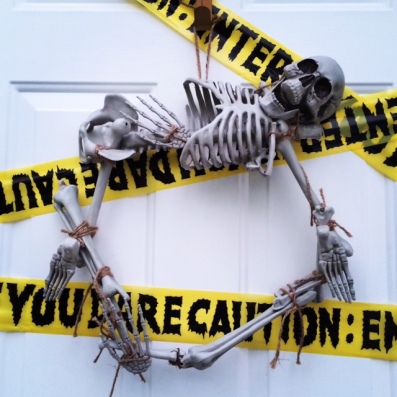
When it’s 90 degrees and humid as heck outside it’s hard to believe that fall is right around the corner, but as the stores are already reminding us (most have had Halloween stuff out since July – whaaaaat?!), fall is right around the corner! With that being said I want to get a jump start on sharing some of my fun DIY Halloween décor that I didn’t get around to sharing last year. Since I’m a little wreath obsessed, I want to begin by sharing this super simple but a bit unconventional Halloween skeleton wreath with you. It’s a little something I came up with when I was pressed for time (and cash!) last Halloween but still wanted to get a fun wreath up on the door. I hope this jumpstarts your Halloween creativity and inspires you to think outside the box when it comes to your front door décor!

SUPPLIES

  • 1 plastic skeleton – I purchased mine at Micheals in September and believe it or not it was already 60% off not even close to Halloween! It was originally about $11.99 but I was able to snag it for under $5. I don’t have the exact product escription or dimensions but something like this would work just fine and I’d imagine you could find the same one in Michaels or your other local craft store this year.

skel

  • Twine or fishing line – I thought that twine looked a little more spooky and haunted-house/pirate-like and I already had it on hand so that was my string of choice but in a pinch any weather-resistant string will do!

INSTRUCTIONS

Step 1: Begin by separating your skeleton into pieces. Doing so at the joints will work best because you can just pop them out where they are attached. As you can see, I left the torso in tact and removed the head, legs, arms, feet and hands but the way you decide to break up ‘ol lazy bones is totally up to you!

skel2

Step 2: Form a rough circle using your torso, arms and legs, then tie them together using the twine (or string of choice). It may take a little manipulation and re-tying but eventually the skeleton will resemble somewhat of a circle.

skel3

Step 3: Lastly, tie your skull, hands and feet to the “wreath” wherever you see fit. You can also go a step further and add cobwebs, spiders or even splatter red paint to look like blood (eek!).

skel4

That’s it! Sometimes the clearance rack is a real gold mine when it comes to last-minute décor and in my case it got me to think outside the box when it came to an October wreath 🙂